• Skip to primary navigation
  • Skip to main content
  • Skip to primary sidebar
Gokul Deepak

Gokul Deepak

GoCool and Debug

  • Home
  • Terraform
  • WordPress
  • Android
  • How to
  • About Me

How to

Learn with Gokul

December 30, 2023 by Gokul Deepak S Leave a Comment

As famous Tamil poet Auvaiyar said “Katradhu Kai Mann Alavu, Kallathathu Ulaga Alavu” which is equivalent to  “Known is a drop, unknown is an ocean.” Even though we may have used some of the DevOps tools for some of the projects it is never complete. There will be a lot of scope to learn about using the specific tool.  

I’m good(self-certified) at exploring new tools and implementing them in the projects but the features of that tool may be more than what I have explored and new features may have been added in the newer versions. So I wanted to relearn some of the tools with all of you.  I’m planning to start a new series of Vlogs, “Learn with Gokul”.

I enjoy learning and building something technical. Have a broad range of interests too. Always wanted to share the world whatever I learn or build. I hope this will be helpful for me too. I wanted to break anything too technical to a layman’s language.

Topics:

As of now, I have some topics on my mind to explore or relearn. The list will expand for sure.

  1. Terraform
  2. Kubernetes
  3. Docker
  4. Jenkins
  5. Azure DevOps
  6. Linux
  7. Ansible
  8. AWS
  9. Azure
  10. GCP
  11. Kotlin
  12. Git
  13. SonarQube
  14. Nginx
  15. Apache Webserver
  16. Apache Tomcat
  17. WordPress
  18. PHP
  19. Python
  20. Shell Script

Filed Under: How to

Ubuntu 20.04 commands for Beginners

September 11, 2020 by Gokul Deepak S Leave a Comment

dateDisplays the current date and time of the system
calDisplays the current month’s calendar
uptimeshows the uptime of the system
whoamicurrent user’s name
userslogged in user name
idcurrent user’s id
who
w
manreference manual of other commands
lsLists Directory
catView whole File at once
moreView File page by page
lessView File page by page (Loads faster than more)
headDisplay first 10 lines of a file
tailDisplay last 10 lines of a file
wc -lCount number of lines in a file

Filed Under: How to

How to add ads.txt on Bluehost

November 23, 2017 by Gokul Deepak S Leave a Comment

We have already seen how to create ads.txt file if you are using Adsense. Now we can see How to add ads.txt on Bluehost

How to add ads.txt on Bluehost:

Step 1: Login to Bluehost hosting account.

Step 2: Go to Cpanel Tab

Step 3: Click on File Manager

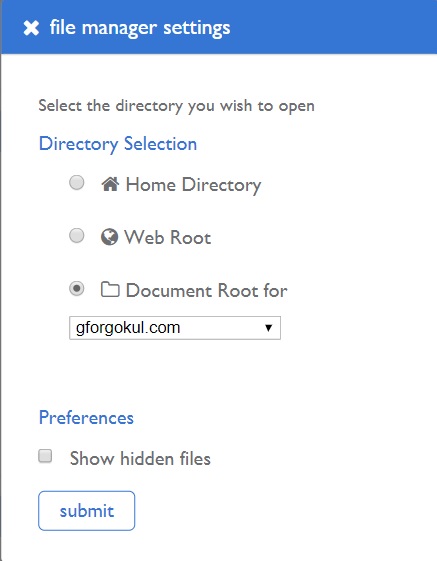
Step 4: In Director Selection Click on ‘Document Root for’ and select our required domain name from the list before submitting.

How to add ads.txt on Bluehost

Step 5:  Click on the Upload button and upload the ads.txt file.

Mission Completed!!!

Filed Under: How to

How to add ads.txt for Adsense – Simply Explained

November 23, 2017 by Gokul Deepak S 1 Comment

By IAB initiative ads.txt can be added to our blog or website so that there will be transparency in the use of advertising agency. While I was searching for How to add ads.txt for Adsense I haven’t got enough good suggestions. So I’m posting a How to.

You may be using any CMS like WordPress or Drupal or Joomla. Even you may have HTML page website. This method can be applied if you want to add ads.txt for Adsense.

You can also see how to add this ads.txt for Bluehost.

Requirement:

Having server access so that to add a txt file.

How to add ads.txt for Adsense

Step 1: Login to your Adsense Account.

Step 2: Open Notepad and paste this test in it – google.com, pub-0000000000000000, DIRECT, f08c47fec0942fa0

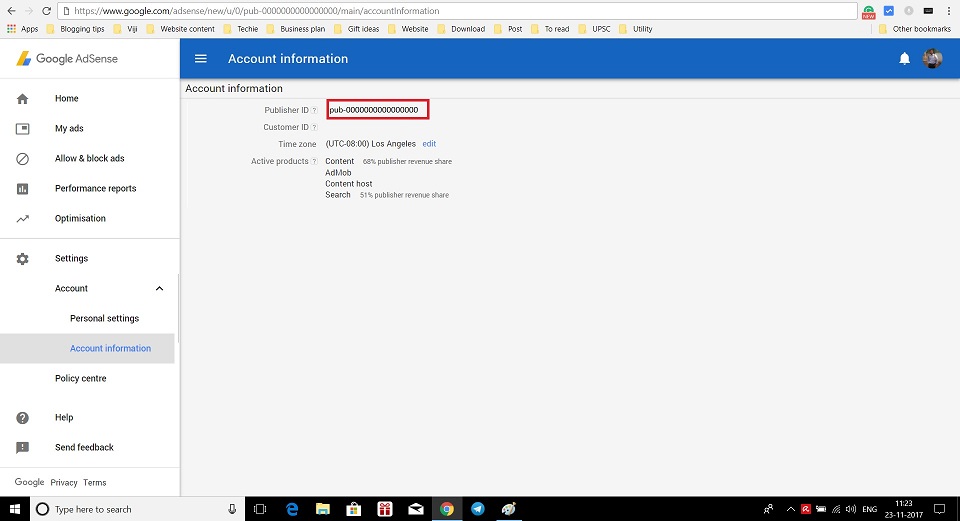
Step 3: Go to Settings-> Account Information. You will find Published id there. Copy it.

How to add ads.txt for Adsense

Step 4: Open Notepad and replace the publisher id given by me with your own published id copied from your Adsense account.

Step 5: Save the file as ads.txt. [Remember do not edit any other text.] Check if you have the format as

google.com, pub-XXXXXXXXXXXXXXXX, DIRECT, f08c47fec0942fa0

Step 6: Upload it to your server so that it can be reached as in http://example.com/ads.txt


P.S: Tag id for Google is constant for everyone – f08c47fec0942fa0

Implementing ads.txt is incredibly simple. The Format is to have:

  • The domain of the advertising system
  • Your account ID
  • The type of relationship you have with that partner (either DIRECT or RESELLER if you are working with a third party)
  • TAG ID is optional.

If you do anything wrong other than what I have mentioned above you will be receiving mail from Google.

Dear Publisher,
We’ve noticed that the ads.txt file on one or more of your sites that you monetise through this AdSense account (pub-xxxxxxxxxxxxxxxx) is missing the correct publisher code.
From mid-October, Google will stop buying ads on sites with ads.txt files which don’t include the correct publisher IDs. We recommend you update your ads.txt files immediately to prevent impact to your earnings. Make sure that the ads.txt file for each site you want to monetise through this account contains the snippet below:
google.com, pub-xxxxxxxxxxxxxxxx, DIRECT, f08c47fec0942fa0
It may take up to 24 hours for AdSense to process your updated ads.txt files.
You can learn more about ads.txt, how buyers will use it and how to implement it on your sites in our Help Centre.


Filed Under: How to

How to get SSL Certificate in WordPress

August 19, 2017 by Gokul Deepak S Leave a Comment

This method is for WordPress Websites. Other websites can skip the step5, 6, 7.

  1. Add Domain name in CloudFlare.net.
  2. Change Nameserver in Domain registration like GoDaddy or Bigrock.
  3. Select Crypto in CloudFlare and select Flexible SSL.
  4. Switch on Automatic https rewrites.
  5. Install CloudFlare plugin in WordPress. Switch on Automatic Redirects.
  6. Install Really simple SSL Plugin and Activate.
  7. Install Better Search Replace database Plugin and Search and replace all http://www.gokuldeepak.com domains to https://www.gokuldeepak.com
  8. Add XML sitemaps to google webmasters search console.
  9. Select www as the preferred domain in Site Settings in Google webmasters
  10. In analytics.google.com change preferred domain as https://gforgokul.com
  11. If you want to redirect http from https://www Please read my old post.

Filed Under: How to

How to Redirect http to https://www through .htaccess

August 19, 2017 by Gokul Deepak S Leave a Comment

Redirect http to https://www through .htaccess.

Simply add the code given below in the .htaccess file. The given code will generate only 302 redirect which means a temporary modification to search engines.

RewriteEngine On 
RewriteCond %{HTTP_HOST} ^example\.com [NC]
RewriteCond %{SERVER_PORT} 80 
RewriteRule ^(.*)$ https://www.example.com/$1 [R,L]

If you need 301 redirection which is a permanent redirection, simply add the code given below.

RewriteEngine On 
RewriteCond %{HTTP_HOST} ^example\.com [NC] 
RewriteCond %{SERVER_PORT} 80 
RewriteRule ^(.*)$ https://www.example.com/$1 [R=301,L]

Do not forget to change example.com to your domain name.

Eg:   example\.com you have to change as gokuldeepak\.com.

Example.com as gokuldeepak.com

Filed Under: How to

  • Page 1
  • Page 2
  • Go to Next Page »

Primary Sidebar

Popular Pages

  • Home
  • How to find the date of the Facebook group it was created
  • Yureka Yu Plus vs Lenovo K3 Note
  • How to Install Windows without GRUB rescue
  • How to Remove LinkWithin logo under 'You Might Also Like' widget in blogger

Archives

Categories

  • Android
  • Apache
  • AWS
  • Blogger
  • Computer Tips
  • DevOps
  • Docker
  • Earn
  • Facebook Tips
  • Git
  • Google Tips
  • Hosting
  • How to
  • Laptop Tips
  • Laptops
  • Linux
  • Mobile
  • MongoDB
  • Nginx
  • Node JS
  • Notepad++
  • PostgresQL
  • Terraform
  • Ubuntu
  • Wordpress
  • Xenforo

Tags

Android Android One AWS Bluehost Comparisions Custom ROM Elementor Facebook Genesis Genesis Sample Theme Google Drive How to Lineage OS Notes OnePlus One OwnCloud Rooting Smartphones Stock ROM Studiopress Tomcat Wordpress plugin

Copyright © 2025 · Maintained by GokulDeepak


Loading Comments...