• Skip to primary navigation
  • Skip to main content
  • Skip to primary sidebar
Gokul Deepak

Gokul Deepak

GoCool and Debug

  • Home
  • Terraform
  • WordPress
  • Android
  • How to
  • About Me

Android One

Downgrade from Lollipop to Kitkat for Micromax Canvas A1 (Android One)

August 29, 2016 by Gokul Deepak S 8 Comments

I was waiting for Android L for many days. when it was released I downloaded and installed without wasting time. But after Installing I hated this new OS. It was confusing and also a trouble maker. So now I want to downgrade from lollipop to kitkat for Micromax Canvas A1. It is easy to upgrade our Micromax Canvas A1 mobile from kitkat to lollipop but we can’t roll back to kitkat in a single click. we have to root our mobile to do so.

I have read in XDA forum but It is not easy to understand. and so I had undergone lot of studies about each and every term and then found the method. Now here I’m sharing with you in simple layman language so that even a newbie can root your mobile and install Android 4.4 (Kitkat).

Lollipop to Kitkat for Micromax Canvas A1:

1. Root Micromax canvas A1:

STEP 1: Backup your Device (Contacts, Sms, WhatsApp to external SD card (Compulsory backup) and Backup External SD card to a computer or Pendrive (Optional Backup).

STEP 2: Download

If your current OS is Android Kitkat then Download this. Android 4.4 KitKat Super SU file = http://download.chainfire.eu/396/Supe… If that link is not available then download from Our Server.

If your current OS is Android Lollipop then Download this. Android 5.1 Lollipop Super SU file= http://download.chainfire.eu/696/Supe… If that link is not available then download from Our Server.

Paste it in root folder in SD card

STEP 3: Install ADB toggle in your android mobile. Open the application and Turn on USB debugging on the device. Software is available in http://adbdriver.com/downloads/ (Download ADB toggle from our server)

STEP 4: Connect your phone to PC and run ADB Driver Installer software and install drivers. Software is available in http://adbdriver.com/downloads/ (Download ADB Driver from our server)

STEP 5: Power off the mobile phone. Press Power button and Volume + button at the same time so that to open bootloader mode.
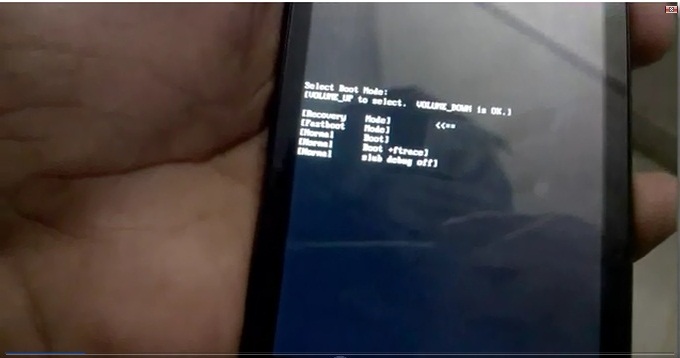
Root Micromax Canvas A1

STEP 6: Select Fastboot mode by clicking Volume – button

STEP 7: Download Android_One_Bootloader_Unlocking_Script. -> extract or unzip the folder

STEP 8: Open the folder ‘Android_One_Bootloader_Unlocking_Script’ and Left click on the empty space of that folder by holding Shift key

STEP 9: Select ‘Open command window here’

STEP 10: Connect your device and type ‘fastboot devices’ on the command. If the device is detected then you will get some hexadecimal numbers and fastboot text. If nothing appears repeat from step 3.

STEP 11: Type ‘fastboot oem unlock’ and hit enter

STEP 12: type ‘fastboot format userdata’

STEP 13: type ‘fastboot reboot’

Your device will reboot now. Then power off you mobile once again and then Press Power button and Volume + button at the same time so that to open bootloader mode.

STEP 14: Download CWM RECOVERY.zip= https://www.androidfilehost.com/?fid=23681161096069936 (Our Server Mirror)

Copy this recovery.img file to the folder ‘Android_One_Bootloader_Unlocking_Script’

Connect your android device to PC if you have disconnected to reboot mobile.

STEP 15: Type ‘fastboot boot recovery.img’

STEP 16: Now in your Micromax Canvas A1 mobile choose ‘Install Zip’ –> ‘Choose zip from external SD card’ –> Select Super SU file copied in Step 2

After installation completed ‘go back’ –> ‘Reboot System now’

Success: You have successfully rooted your Micromax Canvas A1 mobile!! (We are two process ahead to downgrade from lollipop to kitkat for Micromax Canvas A1.

Verify: To check that download root checker basic application in your android mobile and click verify. https://play.google.com/store/apps/details?id=com.joeykrim.rootcheck&hl=en

2. Install CM11

STEP 1: Download CM11 (Download from our server).  Paste it in root folder in SD card.

STEP 2: Power off the mobile phone. Press Power button and Volume + button at the same time so that to open bootloader mode.

STEP 3: Select Fastboot mode by clicking Volume – button

STEP 4: Open the folder ‘Android_One_Bootloader_Unlocking_Script’ and Left click on the empty space of that folder by holding Shift key

STEP 5: Select ‘Open command window here’

STEP 6: Connect your device and type ‘fastboot devices’ on the command. If the device is detected then you will get some hexadecimal numbers and fastboot text.

STEP 7:  Type ‘fastboot boot recovery.img’

STEP 8: Now in your Micromax Canvas A1 mobile choose ‘Clear user data’ (Wipe Data / Factory Reset).

STEP 9: After the wipe process completes, return to main Recovery menu.

STEP 10:  choose ‘Install Zip’ –> ‘Choose zip from external SD card’ –> Select CM11 copied in Step 1

After installation completed ‘go back’ –> ‘Reboot System now’

Success: You have successfully installed with CM11!! (Still One Process ahead to downgrade from lollipop to kitkat for Micromax Canvas A1.

3. Stock ROM using SP Flash tool:

Step 1:Download SP Flash tool and Stock ROM and Extract both of these files.

Step 2: Install ADB toggle in your android mobile. Open the application and Turn on usb debugging on device. Software is available in : http://adbdriver.com/downloads/ (Download ADB toggle from our server)

Step 3: Connect your phone to pc and run ADB Driver Installer software and install drivers. Software is available in: http://adbdriver.com/downloads/ (Download ADB Drivers from our server)

Step 4: Power off your Android Smartphone and remove the battery if it is removable battery.

Step 5: After extracting SP Flash tool folder open flashtool.exe file as shown in image below
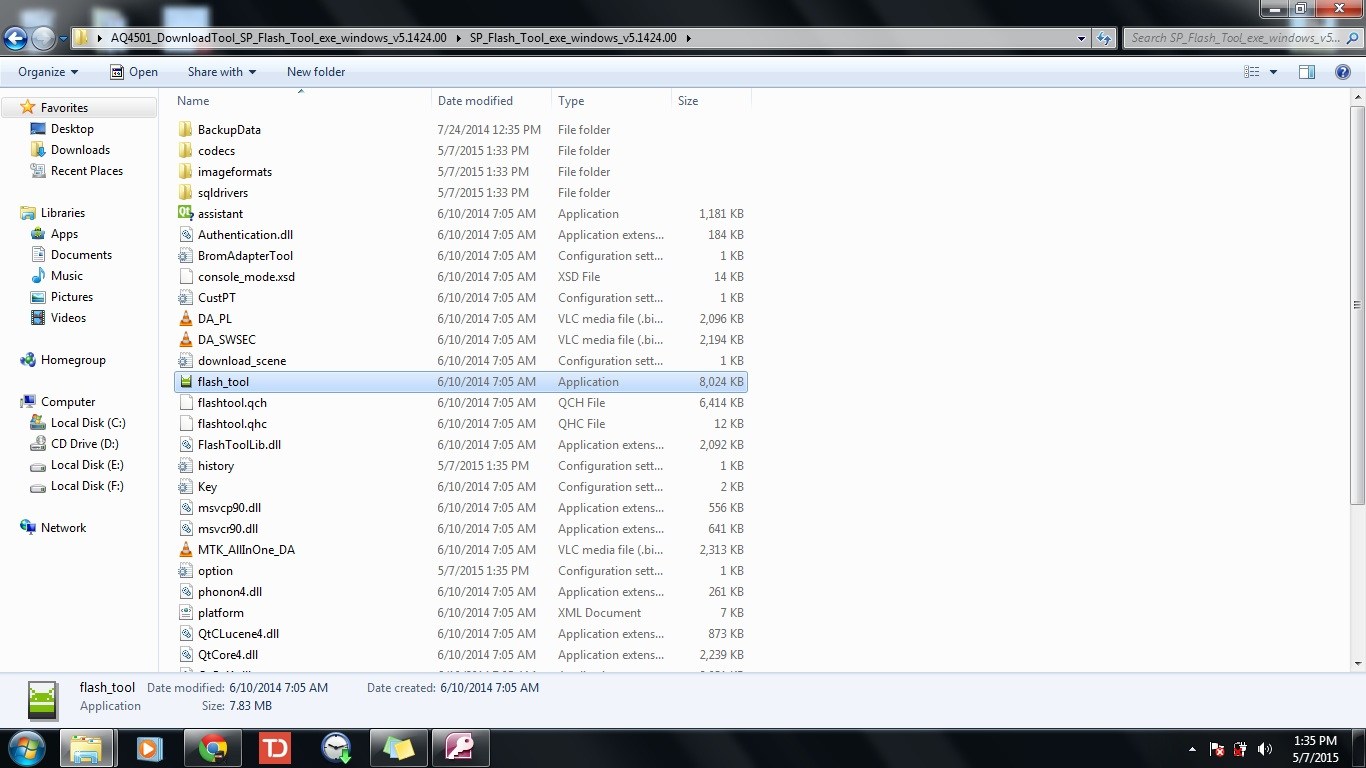
Stock ROM using SP Tool Android one

Step 6: once the Smartphone Flash tool (SP flash tool) is launched. click on scatter-loading button as shown in the picture
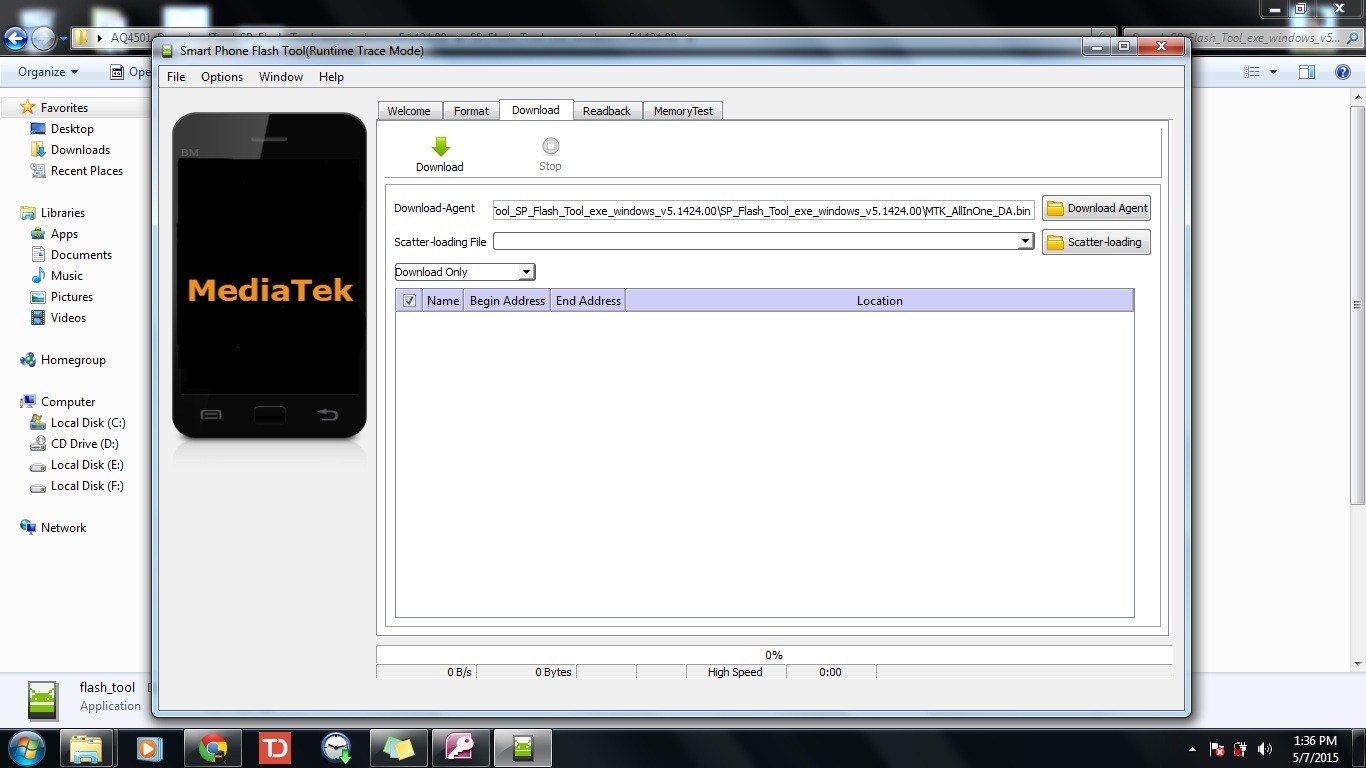
Stock ROM using SP Tool Android One

Step 7: Now a new window will appear to browse for files. go to extracted Stock ROM folder and any .txt file as shown in the picture below. as this is the scatter file the name of the file even contains the Same word so choose that scatter file.txt and click open.
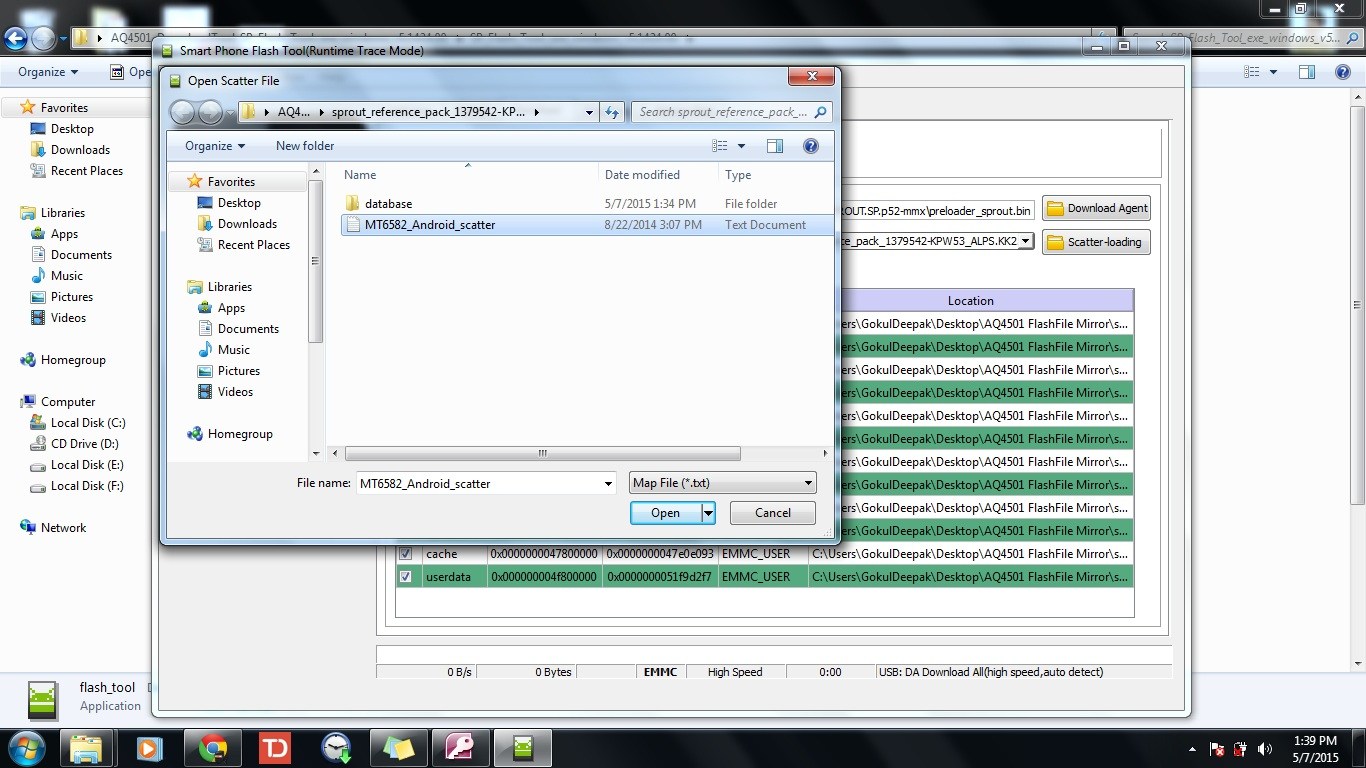
Stock ROM using SP Flash Tool

Step 8: Now click on Download button in the SP flash tool.
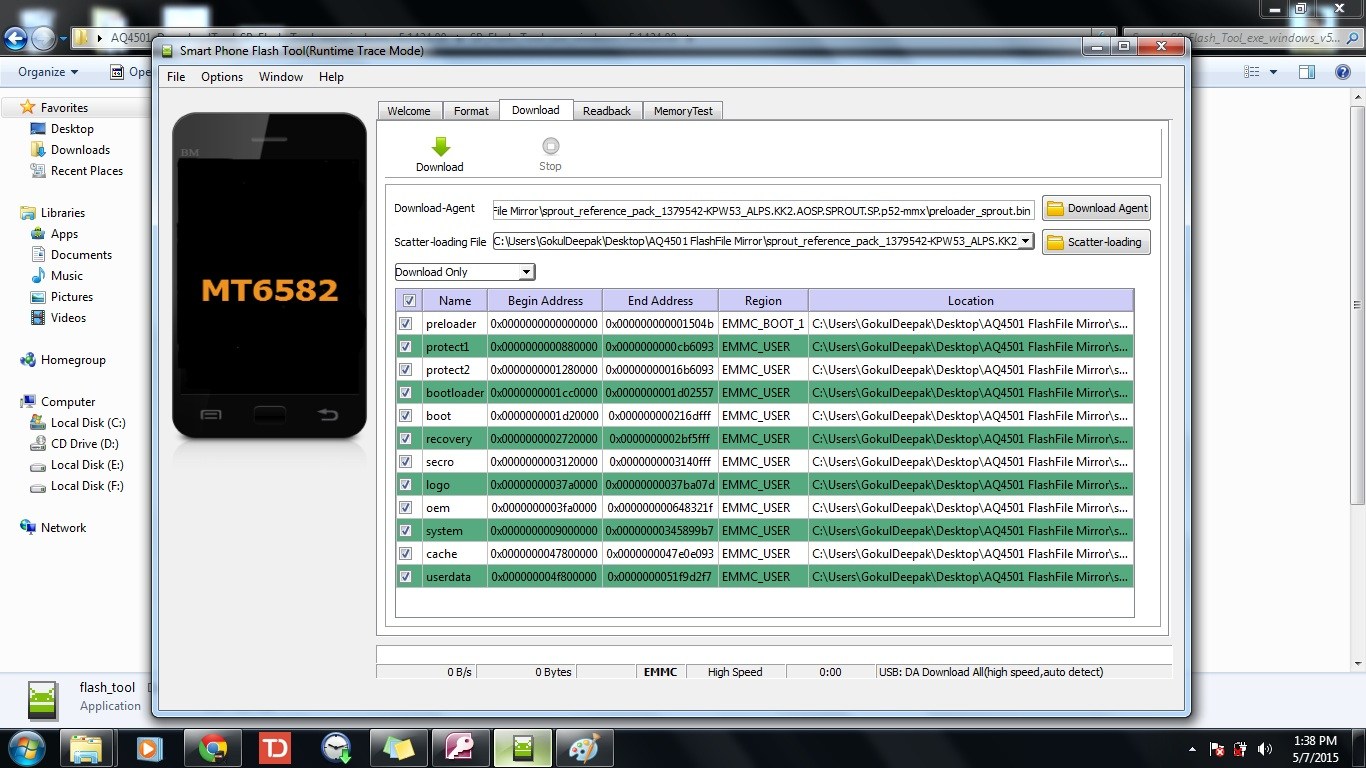
Stock ROM using SP Flash tool Micromax Android

Step 9: Now connect your Android mobile with the computer after removing battery from it. if it does not has removable battery then no problem with that too. After connecting press volume up or volume down button so that computer may easily detect the phone.

Step 10: Once if the download is completed a small window with green circle and ok will appear
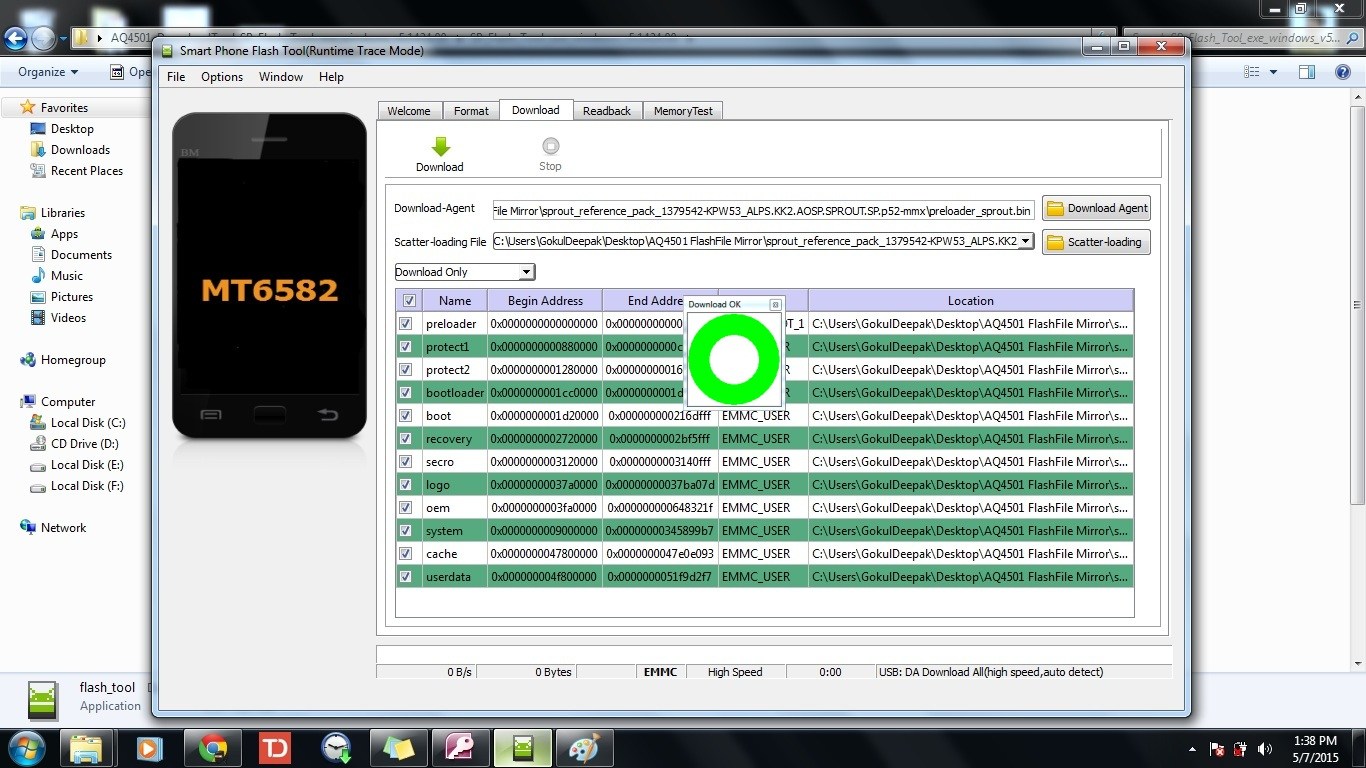
Stock ROM using SP Flash Micromax Canvas

Step 11: Close SP flash tool application and disconnect android mobile from the computer.

Success: Now we had successfully installed the Stock ROM. lollipop to kitkat for Micromax canvas mission is success.

We had replaced our Micromax Canvas A1 Android lollipop with Android Kitkat.

You May Also Like:

  • How To Root Micromax Canvas A1 (Android One)
  • How To Install CM 11 (Cyanogenmod 11) in Micromax Canvas A1
  • How To flash Stock ROM using SP Flash Tool

Filed Under: Android Tagged With: Android One, Custom ROM, How to

How to Stock ROM using SP flash

August 29, 2016 by Gokul Deepak S 2 Comments

We can Stock ROM using SP flash tool. Here I’m explaining how to stock ROM using SP flash tool. Before that let us look at the brief information on Stock ROM, Custom ROM and what are all its differences. Follow the procedure given by me step by step. I have tried to explain everything in a clear way that a novice too could understand what to do and what is happening. But as every techie warns us before their instruction let me also warn, “Try this at home at your own risk”.

Why to Stock ROM?

We may have changed our ROM from Default android version to some other custom ROM and then feel irritated or insecure with those custom ROM and rush to come back to our Stock ROM or some of us may have upgraded from Android Kitkat to Android Lollipop with a joy and don’t know how to come back from Lollipop to kitkat after feeling the terribleness in lollipop ROM.

What is the difference between Stock ROM and Custom ROM?

There are two types of Android OS. Stock ROM and Custom ROM. Where Stock ROM is one which was developed by the manufacturer of the device itself. So the Stock ROM is the default ROM of the device and Custom ROM is where an extra ROM which can be flashed in the device which has required configuration.

Procedure for how to stock ROM using SP Flash tool:

Step 1:Download SP Flash tool and Stock ROM and Extract both of these files.

Step 2: Install ADB toggle in your android mobile. Open the application and Turn on usb debugging on device. Software is available in : http://adbdriver.com/downloads/ (Download ADB toggle from our server)

Step 3: Connect your phone to pc and run ADB Driver Installer software and install drivers. Software is available in: http://adbdriver.com/downloads/ (Download ADB Drivers from our server)

Step 4: Power off your Android Smartphone and remove the battery if it is removable battery.

Step 5: After extracting SP Flash tool folder open flashtool.exe file as shown in image below

Stock ROM using SP Tool Android one

Step 6: once the Smartphone Flash tool (SP flash tool) is launched. click on scatter-loading button as shown in the picture

Stock ROM using SP Tool Android One

Step 7: Now a new window will appear to browse for files. go to extracted Stock ROM folder and any .txt file as shown in the picture below. as this is the scatter file the name of the file even contains the Same word so choose that scatter file.txt and click open.

Stock ROM using SP Flash Tool

Step 8: Now click on Download button in the SP flash tool.

Stock ROM using SP Flash tool Micromax Android

Step 9: Now connect your Android mobile with the computer after removing battery from it. if it does not has removable battery then no problem with that too. After connecting press volume up or volume down button so that computer may easily detect the phone.

Step 10: Once if the download is completed a small window with green circle and ok will appear

Stock ROM using SP Flash Micromax Canvas

Step 11: Close SP flash tool application and disconnect android mobile from the computer.

Success: Now we had successfully installed the Stock ROM.

You May Also Like:

  • Lollipop to Kitkat in Micromax Canvas A1
  • How To Root Micromax Canvas A1 (Android One)
  • How To Install CM 11 (Cyanogenmod 11) in Micromax Canvas A1

Filed Under: Android Tagged With: Android One, How to, Stock ROM

Install CM11 in Micromax Canvas A1

August 29, 2016 by Gokul Deepak S Leave a Comment

Micromax Canvas A1 (Android One) users got double treat as they can get both pure vanilla Android experience with Google’s stock ROMs, and assured third-party custom ROM releases such as CM11 and CM12 from the CyanogenMod team. So Now You can install CM11 in Micromax Canvas A1.

The CyanogenMod11 (CM11) ROM is very good as it gives very light and fast experience with options to choose themes, trebuchet launcher, default file manager, graphical music player and more.

Many users who are connected with internet got auto update of Lollipop. We will be enthusiastic for auto free update but after installing it we will be sad that lollipop is hard to use and not so attractive. Thats the reason many of us are rolling back to kitkat. but if you wish to install other than kitkat then you can choose CM11 without doubt as it also has same appearance and an easy to use interface. To roll back to Kitkat (Android 4.4.4) itself click here.

Now here we are going to see how to install CM11 in Micromax Canvas A1 by step by step.

Conditions:

  • The instructions given below is only for Android one users. especially Micromax Canvas A1 users as i have tried in that device personally.
  • Charge your device upto 80% so that battery may not drain while flashing ROM.
  • Backup all your contacts to google account or export .vcf file to memory card. Back up Whatsapp or any other messaging app to your SD card. If you are using applications like reminder or money lover backup those files too. After backing up all phone contents to SD card copy all files in SD card to computer so that even if there was any misshapen we won’t loose data and free to format out mobile and SD card.

Root Micromax canvas A1:

You can install CM11 or any other new OS in Android mobile only after getting root access for your mobile.

STEP 1:  Backup your Device (Contacts, Sms, WhatsApp to external SD card (Compulsory backup) and Backup External SD card to a computer or Pendrive (Optional Backup).

STEP 2: Download

If your current OS is Android Kitkat then Download this. Android 4.4 KitKat Super SU file = http://download.chainfire.eu/396/Supe…   If that link is not available then download from Our Server.

If your current OS is Android Lollipop then Download this. Android 5.1 Lollipop Super SU file= http://download.chainfire.eu/696/Supe…  If that link is not available then download from Our Server.

Paste it in root folder in SD card

STEP 3: Install ADB toggle in your android mobile. Open the application and Turn on USB debugging on the device. Software is available in http://adbdriver.com/downloads/  (Download ADB toggle from our server)

STEP 4: Connect your phone to PC and run ADB Driver Installer software and install drivers. Software is available in http://adbdriver.com/downloads/  (Download ADB Driver from our server)

STEP 5: Power off the mobile phone. Press Power button and Volume + button at the same time so that to open bootloader mode.

Root Micromax Canvas A1

STEP 6: Select Fastboot mode by clicking Volume – button

STEP 7: Download Android_One_Bootloader_Unlocking_Script. -> extract or unzip the folder

STEP 8: Open the folder ‘Android_One_Bootloader_Unlocking_Script’ and Left click on the empty space of that folder by holding Shift key

STEP 9: Select ‘Open command window here’

STEP 10: Connect your device and type ‘fastboot devices’ on the command. If the device is detected then you will get some hexadecimal numbers and fastboot text. If nothing appears repeat from step 3.

STEP 11: Type  ‘fastboot oem unlock’ and hit enter

STEP 12: type ‘fastboot format userdata’

STEP 13: type ‘fastboot reboot’

Your device will reboot now. Then power off you mobile once again and then Press Power button and Volume + button at the same time so that to open bootloader mode.

STEP 14: Download CWM RECOVERY.zip= https://www.androidfilehost.com/?fid=23681161096069936  (Our Server Mirror)

Copy this recovery.img file to the folder ‘Android_One_Bootloader_Unlocking_Script’

Connect your android device to PC if you have disconnected to reboot mobile.

STEP 15:  Type ‘fastboot boot recovery.img’

STEP 16: Now in your Micromax Canvas A1 mobile choose ‘Install Zip’ –> ‘Choose zip from external SD card’ –> Select Super SU file copied in Step 2

After installation completed ‘go back’ –> ‘Reboot System now’

Success: You have successfully rooted your Micromax Canvas A1 mobile!!

Verify: To check that download root checker basic application in your android mobile and click verify.  https://play.google.com/store/apps/details?id=com.joeykrim.rootcheck&hl=en


2. Install CM11

STEP 1: Download CM11 (Download from our server).  Paste it in root folder in SD card.

STEP 2: Power off the mobile phone. Press Power button and Volume + button at the same time so that to open bootloader mode.

STEP 3: Select Fastboot mode by clicking Volume – button

STEP 4: Open the folder ‘Android_One_Bootloader_Unlocking_Script’ and Left click on the empty space of that folder by holding Shift key

STEP 5: Select ‘Open command window here’

STEP 6: Connect your device and type ‘fastboot devices’ on the command. If the device is detected then you will get some hexadecimal numbers and fastboot text.

STEP 7:  Type ‘fastboot boot recovery.img’

STEP 8: Now in your Micromax Canvas A1 mobile choose ‘Clear user data’ (Wipe Data / Factory Reset).

STEP 9: After the wipe process completes, return to main Recovery menu.

STEP 10:  choose ‘Install Zip’ –> ‘Choose zip from external SD card’ –> Select CM11 copied in Step 1

After installation completed ‘go back’ –> ‘Reboot System now’

Success: You have successfully installed with CM11!!

Hope this post helps newbies to install CM11. If you find anything hard or contradiction just feel free to comment below.

You May Also Like:

  • Lollipop to Kitkat in Micromax Canvas A1
  • How To Root Micromax Canvas A1 (Android One)
  • How To flash Stock ROM using SP Flash Tool

Filed Under: Android Tagged With: Android One, Custom ROM, How to

How to Root Micromax Canvas A1 (Android one)

August 29, 2016 by Gokul Deepak S Leave a Comment

I was just a newbie when I rooted my device. XDA forum had the answer for how to root Micromax Canvas A1 which only an expert can understand. I did a lot of google and the found the answers. I’m writing each step clearly in this blog so that even a novice can root his mobile, That’s the reason why this post has a lot of steps. All the steps are very easy one. Noobs just excuse me and please skip known steps.

Note: Warranty may be void of your device if you root Micromax Canvas Android one

How to Root Micromax Canvas A1:

STEP 1:  Backup your Device (Contacts, Sms, WhatsApp to external SD card (Compulsory backup) and Backup External SD card to a computer or Pendrive (Optional Backup).

STEP 2: Download

If your current OS is Android Kitkat then Download this. Android 4.4 KitKat Super SU file = http://download.chainfire.eu/396/Supe…   If that link is not available then download from Our Server.

If your current OS is Android Lollipop then Download this. Android 5.1 Lollipop Super SU file= http://download.chainfire.eu/696/Supe…  If that link is not available then download from Our Server.

Paste it in root folder in SD card

STEP 3: Install ADB toggle in your android mobile. Open the application and Turn on USB debugging on the device. Software is available in http://adbdriver.com/downloads/  (Download ADB toggle from our server)

STEP 4: Connect your phone to PC and run ADB Driver Installer software and install drivers. Software is available in http://adbdriver.com/downloads/  (Download ADB Driver from our server)

STEP 5: Power off the mobile phone. Press Power button and Volume + button at the same time so that to open bootloader mode.

Root Micromax Canvas A1


STEP 6: Select Fastboot mode by clicking Volume – button

STEP 7: Download Android_One_Bootloader_Unlocking_Script. -> extract or unzip the folder

STEP 8: Open the folder ‘Android_One_Bootloader_Unlocking_Script’ and Left click on the empty space of that folder by holding Shift key

STEP 9: Select ‘Open command window here’

STEP 10: Connect your device and type ‘fastboot devices’ on the command. If the device is detected then you will get some hexadecimal numbers and fastboot text. If nothing appears repeat from step 3.

STEP 11: Type  ‘fastboot oem unlock’ and hit enter

STEP 12: type ‘fastboot format userdata’

STEP 13: type ‘fastboot reboot’

Your device will reboot now. Then power off you mobile once again and then Press Power button and Volume + button at the same time so that to open bootloader mode.

STEP 14: Download CWM RECOVERY.zip= https://www.androidfilehost.com/?fid=23681161096069936  (Our Server Mirror)

Copy this recovery.img file to the folder ‘Android_One_Bootloader_Unlocking_Script’

Connect your android device to PC if you have disconnected to reboot mobile.

STEP 15:  Type ‘fastboot boot recovery.img’

STEP 16: Now in your Micromax Canvas A1 mobile choose ‘Install Zip’ –> ‘Choose zip from external SD card’ –> Select Super SU file copied in Step 2

After installation completed ‘go back’ –> ‘Reboot System now’

Success: You have successfully rooted your Micromax Canvas A1 mobile!!

Verify: To check that download root checker basic application in your android mobile and click verify.  https://play.google.com/store/apps/details?id=com.joeykrim.rootcheck&hl=en

You May Also Like:

  • Lollipop to Kitkat in Micromax Canvas A1
  • How To Install CM 11 (Cyanogenmod 11) in Micromax Canvas A1
  • How To flash Stock ROM using SP Flash Tool

Filed Under: Android Tagged With: Android One, How to, Rooting

Primary Sidebar

Popular Pages

  • Home
  • How to find the date of the Facebook group it was created
  • Yureka Yu Plus vs Lenovo K3 Note
  • How to Install Windows without GRUB rescue
  • How to Remove LinkWithin logo under 'You Might Also Like' widget in blogger

Archives

Categories

  • Android
  • Apache
  • AWS
  • Blogger
  • Computer Tips
  • DevOps
  • Docker
  • Earn
  • Facebook Tips
  • Git
  • Google Tips
  • Hosting
  • How to
  • Laptop Tips
  • Laptops
  • Linux
  • Mobile
  • MongoDB
  • Nginx
  • Node JS
  • Notepad++
  • PostgresQL
  • Terraform
  • Ubuntu
  • Wordpress
  • Xenforo

Tags

Android Android One AWS Bluehost Comparisions Custom ROM Elementor Facebook Genesis Genesis Sample Theme Google Drive How to Lineage OS Notes OnePlus One OwnCloud Rooting Smartphones Stock ROM Studiopress Tomcat Wordpress plugin

Copyright © 2025 · Maintained by GokulDeepak


Loading Comments...